Maker Module 003: USB rechargeable power source
Originally posted 2015: information may be out of date, as this tech moves so fast! These 'Maker Modules' were a series of mini 'recipes' for extending components which can in turn be combined into something cool.
This Maker Module gives you a one-stop power source for your small project. By coupling a cheap and widely available charger module with a battery (of suitable chemistry) and switch, MM03 can be switched from ‘power source’ to ‘charging/off’ modes. ‘Power’ mode outputs nominal battery voltage, whilst ‘charging’ mode disconnects the load attached to the battery in favour of the monitored charging circuitry (and associated LED indicators).
*Disclaimer* – I cannot be held responsible for any combination of materials here described leading to personal damage or injury. Batteries are dangerous, particularly LiPo (Lithium Polymer) varieties, which can rapidly explode and cause fire if mistreated, charged too rapidly or else accidentally ‘shorted’. You have been warned!
Parts
- TP4056 USB battery charge module (available via eBay with either USB mini or micro connector)
- Suitable resistor (see below for appropriate rating)
- Battery (check the supported battery voltage and chemistries on your TP4056 based charge module)
- SPDT switch
Construction
There’s little to this make, beyond using the TP4056 module correctly. These typically come from the factory with a 1.2K resistor installed however, which equates to a 1A charge current. The important thing to note here is a basic rule that you should charge your battery with no more than 1C incoming current (i.e. a charge current of no more than the capacity of the battery). If you were planning to use a 1Ah (or greater capacity) battery, then that’s fine, but LiPo batteries are very common in much smaller capacities, and this default then represents TOO MUCH current; the resistor needs to be swapped for a higher value – failure to do so may result in a fire! The documentation details appropriate selection of a resistor ‘Rprog’ to manage the charging current supplied to the battery.
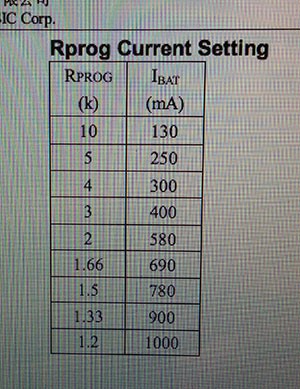
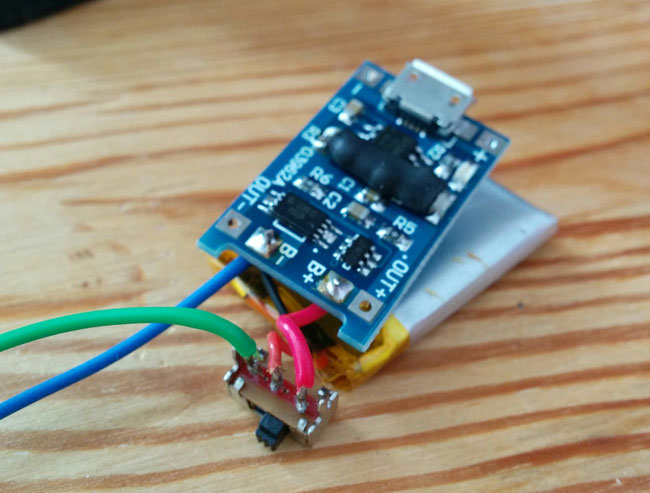
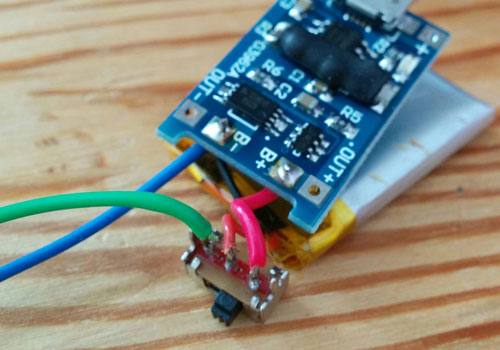
Consider my (depicted) example case: I have a battery rated at 190mAH. A safe (1C) charge current is therefore 190mA. The factory installed 1A charge current on average TP4056 board is over 5 times larger than this (5C)! I definitely need a different Rprog resistor to charge this particular battery. The table above gives appropriate values for my board – I can see that with a 5K resistor, I’d still be too high at a charge current of 250mA. The best value there is the topmost: 10K, giving a smaller than 1C charge current of 130mA.
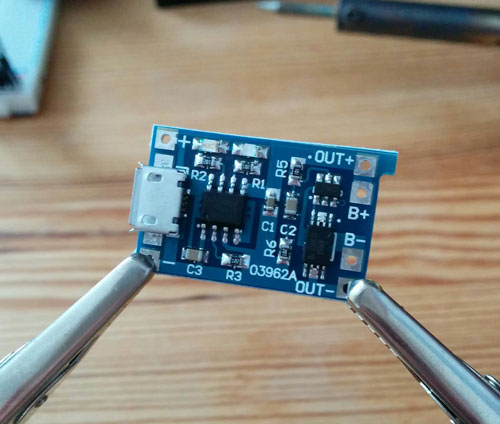
Swapping out the resistor is fiddly, given that the default Rprog is a teeny tiny surface mount component. With a little care (and reference to the board to ensure that the targeted resistor is the right one), it can be cleanly removed. ‘R3’ is the Rprog resistor, on my module:
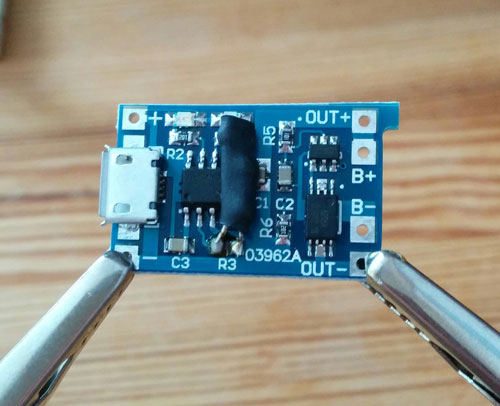
With as much care, a replacement resistor (in my case a normal sized component) can be inserted in place (here heat shrink wrapped too, to prevent conduction between random components)
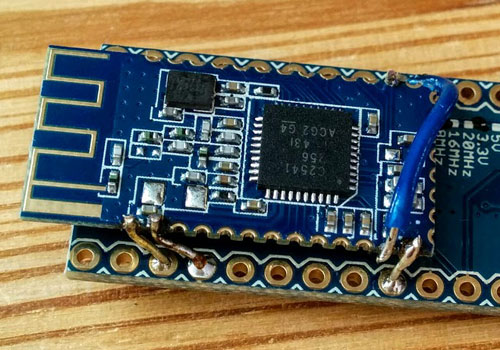
The board is now ready to charge my 190mAH LiPo battery. Let’s add a switch to improve the board’s utility now. The following circuit diagram shows how this should work:
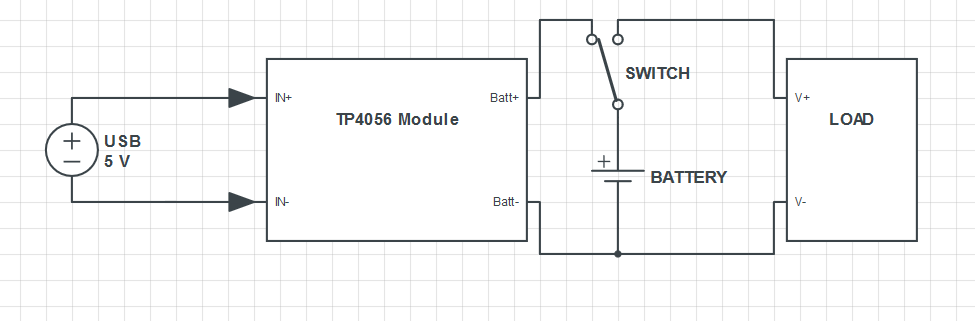
In one position, the switch creates a circuit from the battery across whatever load needs it. In the other position, the ‘load’ circuit is broken, and the normal ‘charge’ circuit completed instead. In this latter position, with a USB cable plugged in, the battery can be charged until the LED indicator on the module lights up to indicate that the battery is at capacity. Without a USB cable plugged in, this switch position is also a convenient ‘off’ switch for the load.
More projects

SpidertownDigital Art

Toon Cup 2022 updatesHTML5 Game
Dodger: WantedHTML5 Game

The HuntsmanDigital Art

The Little MermaidDigital Art

Snow WhiteDigital Art

RapunzelDigital Art

Red Riding HoodDigital Art
Global Game Jam 2020: REPAIRHTML5 Game


LabuntinaIn-app HTML5 Game

Tee and Mo: Little WorldHTML5 Game

Word TrainHTML5 Game


Flip and MatchHTML5 Game


Hydra3D Art

Blue Bird3D Art

RainbowSpill3D Art

Vanity3D Art

Gumball Guy3D Art

Helmet Guy3D Art

Wired Eyed3D Art

Cauldron Guy3D Art

Jelly Crab3D Art
Kraft3DHobby business

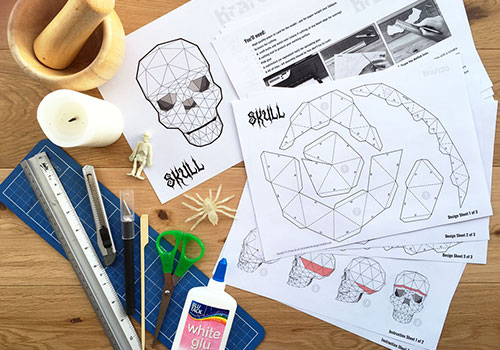
Papercraft fishMake

Paperfishion3D Art

BAFTA KidsVideo Appearance


The Next StepGame Character
GyaradosGame Character

Gastly3D Render

Iron Man Poster3D Render

Art Station ChallengeGame Character
Construction Site Lamp3D Render

LileepGame Character


Stareoke StagefrightFlash Game

Richard Hammond's Blast LabFlash Game

Blue Peter: Turkish BizarreFlash Game

The Right MixFlash Game

Big and SmallFlash Game

Tate AirbrushFlash Game

Tee and Mo Face PaintingHTML5 Game

Tee and Mo WebsiteWordpress Website

Zingzillas: The Great Coconut AdventureFlash Game

Tree Fu TomFlash Games

Let's PlayUnity3D/Flash Game

Elmo Loves 123sAIR App: iOS and Android
All Star RacingHTML5 Game
Crabtree PlusWordpress Website, HTML5 games

TwirlywoosHTML5 Games

The OctonautsHTML5 Website, Flash games

Elmo's Art MakerHTML5 Game

Pop and SpellHTML5 Game

Paw Patrol Air PatrollerHTML5 / HAXE Game

Tee and Mo Playtime (iOS, Android)AIR App: iOS and Android

Operation Ouch: Snot ApocalypseHTML5 Game

MegamanGame Character
Operation Ouch: Clone WardsHTML5 Game

SupernormalsDigital Art

The Lion KingDigital Art
Alan Owen:
Creative Developer (geographically based near Worthing, UK).
INDUCTIBLE LTD
Registered in England and Wales with company number 13501602
Registered office: 3rd Floor 86-90 Paul Street, London, EC2A 4NE
Developing rich interactive content since 2004
